Showing posts with label spray paint. Show all posts

Wednesday, December 28, 2011

2011 Wrap Up

Hello friends! 2011 has been a big year and I can't wait to share with you some of my favorite posts and happenings.

My five most popular posts this year have been:

#5


I love these in my bedroom. The cream color adds some much needed light to the space!

#4


I paid $14 for 2.75 yards of this gorgeous Sun N Shade fabric and am planning on finishing up my deck project this summer. Here are the fabrics I'll be using.


#3


This summer I did a mini re-do of my downstairs bathroom. It was just the freshening up I needed...and SO simple! I've since added a DIY Sunburst Mirror to the spot next to the mirror. It's the perfect finishing touch!


#2


This was another one of those never ending projects. I had so many problems with the paint bubbling up and I spent so much time sanding and re-sanding. In the end, it was worth it! This is the perfect storage solution for DVDs, diapers and wipes, toys...I love it! I do still need to buy the hardware I've got picked out but I'm having a difficult time getting myself to spend the money. The knobs and pulls are $5 each and I know that doesn't sound like much but that's $60 total and I just don't want to take it out of my budget. I am planning on a re-do of this whole space sometime this year so when I begin that, I'll buy my knobs :)

#1


This was by far my most popular post this year and one of my favorite projects. This goes to show you what a little bit of elbow grease can do. I bought the bench for $20 on Craigslist, pulled off some nasty upholstry and padding, repainted and reupholstered it. For a $30 total investment, I have a fun new piece of furniture and a great addition to my little girl's room.

So, those were my most popular posts of 2011. I want to share a few of my personal favorites.

#3

I loved the Valentine's Day crafts I did this year and I smiled every time I looked at them. I can't wait to get them back up and to do even more this year :)


#2


I love this little guy. He just makes me happy :)

#1


These are my absolute favorite project from this past year. I fell in love with the fabric and got an awesome deal when I found it in the clearance bin at Joann. Unfortunately, I only had enough for one window. I hunted and hunted for this online but this color isn't made anymore. (It's Waverly Lovely Lattice in mocha. They do make this in the Sun N Shade fabric but I had the 100% cotton and needed the same to match up to what I already had.) Finally, I tripped over a store that had this online.

I love everything about this fabric. The weight, color and pattern are perfect and the curtains are perfect for my living/dining area. Almost every time I look at them, I can't believe how lucky I was to find that second five yards :)

2012 is going to be a busy year for me too. I've got a monster list of projects and to-dos that I'm planning on posting soon. Included in that list will be converting my guest room/office into a nursery for a baby boy coming in April. That's my biggest DIY project planned for 2012. (The baby, not the room!)

I've had so much fun looking back on 2011 and it's inspired me to forge ahead in the coming year. I've loved all the friendships that have developed through this blog and all the support I've received. Thank you ALL for making it wonderful :)

Linking up to:

Tuesday, October 25, 2011

Weekend Project - On Hold

Well, I don't want to leave you all high and dry but my Craigslist chairs project is on hold. I've got them all painted and ready for new upholstery but I couldn't find what I wanted locally so I had to order the fabric online. You know how that is, you have something specific in mind and you just can't make anything else work out...

I can promise you this, these chairs are going to be FANTASTIC! Just the new coat of paint has got them looking so much better and so chic. Here's a little preview...


I'm not going to tell you what fabric I chose because I want it to be a surprise...Just know that it's going to be FAB!! The fabric is in transit so I'm hoping to be able to finish these up this weekend. In the meantime, I've got some other projects to share with you so stay tuned!

Thursday, August 25, 2011

Adirondack Chair Before & After

Remember here where I showed you the awesome deal I got on these Adirondack chairs? Well, I went ahead and gave them a simple makeover.


These chairs were SO faded...they just soaked up the paint. I ended up putting four coats on!


Anyhow, they turned out great! I love the crisp navy blue color.


They're a great addition and a nice lounge area for the deck. At $2.00 for the chairs and ottomans and about $20.00 for the paint, they're a great deal!


On another note, we finally started staining! (Yes, that is a different furniture set up there. I'll tell you about that another time!)


Linking up to:

Tuesday, August 23, 2011

DIY Sunburst Mirrors - On The Cheap!

Hello! So, I realize there are about a million tutorials all over the blogosphere for these and I'm probably on the back side of the trend but I was so excited about these that I figured I'd share anyway.


I made two mirrors. I wanted one large and one small so I bought two different sizes of mirrors. The larger of the two was $1.49 and the smaller was $0.99. I picked up two packages of barbeque skewers and a sheet of foam core poster board at the Dollar Tree.


I placed both mirrors on the board and traced them...


...then I cut out the circles.


I found the center of each circle and stuck a skewer in it to mark it off.


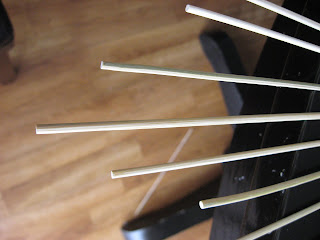
Then, I hot glued the skewers around, meeting in the middle and trying to evenly space them.


Then, I glued a skewer at the edge of the board between each of the skewers affixed at the middle.


Then, I glued more on either side of those glued at the edge of the board but glued them at the in-between point of the other skewers.


Finally, just for good measure, I glued the crap out of it. I put a thick coat of hot glue over the whole thing just to make sure it all stuck together.


View from the top :)


I painted one oil-rubbed bronze and the other heirloom white, making sure to evenly coat all sides of the skewers and the piece of foam board.


I poked a hole in the back of the foam board for hanging. I love the finished product! This one is big - almost three feet wide.
(Yes, I realize this isn't perfectly centered on the wall. For now, it's good enough!)


For the smaller one, I used the same process but first cut the skewers in half.


It's just what my downstairs bath needed!


The total cost for this project was $5 - for BOTH MIRRORS! $2.50 for the mirrors themselves, $2.00 for two packages of skewers and $0.50 for the foam board. I had the paint on hand.

For $5.00, I don't care if I'm behind the times or coming in at the tail end of this trend. I love my mirrors :)

Have you made any DIY sunburst mirrors like this? I know I've seen so many beautiful variations out in blogland...if you have, link it up in the comments below! I'd love to see!

Saturday, July 23, 2011

DIY Mirror Frame

Hello! I was so flattered by the comments I got about my bathroom re-do and I'm so excited to show you how I fixed up the builder grade bathroom mirror. I know so many of us have those and don't know what to do with them. I got the idea from Mirror Mate, a company that sells custom frames for boring mirrors. While they're great, I just didn't want to spend much money.


I started with my boring, plain, builder grade mirror.


I picked out some decorative trim from Home Depot. I decided to stick with something narrow since this isn't a very big mirror to begin with and I didn't want to take up too much of the mirror surface.

I cut the trim, angling the corners, using a miter saw...


...and notched out the back where the frame was going to go over the clips holding the mirror in place.


I painted the frame yellow with just a standard spray paint. and bought these Command poster hanging strips. I considered getting the picture hanging strips but this trim is so light weight and I wanted it to sit as flush against the mirror as possible. This line of products from Command is awesome! I use them on everything!


I just adhered the individual pieces of trim to the mirror...


...and there you have it! All in all this project cost less than $20 - $15 for the trim and $3 for the paint. It took less than an hour in work time. Not bad for something that makes such a big impact!

Next, I'll be working on my master bath mirror. I'm thinking about a somewhat different treatment for that one though. I'm still working out the logistics but I can tell you, it's going to be GREAT!

I finally was able to get a short enough break in the humidity to get my sunburst mirrors painted. I'll be posting them within the next few days :)

What kind of changes have you made that took so little but made a huge impact?

Monday, July 11, 2011

Craigslist Dresser...Done?

Hello, all! I hope everyone had a great weekend. Mine was pretty mellow...I started working on a couple sunburst mirrors. I would be done but it was SO hot and humid, I didn't want to go outside to paint them. So, hopefully today after work I will be able to get those done!

Today I'm going to show you a peek at my downstairs family room. This room is BAD. Disgusting. It has been severely neglected since we moved in to this house a year and a half ago. My husband and I can't agree on a direction for this room to take. We've got two of his outdoorsy, sportsman type pictures hanging down here and as much as I hate them, I feel like I need to give him some input. I told him that we can put his autographed baseballs and bat down here somewhere (because I flat-out refuse to put them in the bedroom, where he really wants them!) but I don't know how to mix his sports memorabilia with the outdoorsman type stuff. I swear that one of these days I will figure it out. It's at the top of my to-do list!


Anyway, here is the TV wall. We used to have an entertainment armoire here but it just seemed too heavy for the space. In the interim, we've been using this old farmhouse table that I used to use for my desk.


Look at all that clutter! It drives me so crazy. Luckily, I spend so little time down here that I don't need to see it constantly. I realized that we needed a solution for storage so I was on the hunt for a dresser I could use as a media stand.


Enter my $35 Craigslist dresser...

I loved the faux bamboo trim on here. It's also huge and heavy. It is going to provide so much storage!


I sanded...

...and primed.


...and had issues with the paint bubbling, chronicled here. I really was exasperated and had to fight to keep myself from giving up.


Well, after sanding and re sanding a few (10?) times, I finally got it looking pretty!


I've still got a lot of work to do in this room. It's a work in process :)


I still need to get some new hardware for it. The dresser was missing one of the original pulls. Unfortunately, there is no way I'll be able to find a match because they are so unique, so I'm on the hunt for new ones. I'm thinking some polished chrome would look really pretty on there.

I have some posts in process for this week and like I mentioned earlier, I'm really hoping to get those sunburst mirrors done. So, my question for today is...what have you found on Craigslist?


Linking up to:
Related Posts Plugin for WordPress, Blogger...