Hey there, I just thought I should drop in to let you know that I'm still around. I've just been going through a little slump.
I'm still working on the guest room/office re-do and I've got a mini bathroom revamp I'll be working on in the next couple weeks. This weekend My husband and I are planning to work on a gallery wall...
Good stuff is coming, I swear! Please don't give up on me :)

Thursday, March 31, 2011
Thursday, March 24, 2011
Dreaming Of Spring
Just when I thought that Spring was here, Mother Nature decided to pull a fast one and dump 19 inches of snow in my area. It was the craziest thing, the other evening when I was cooking dinner I heard thunder. That in and of itself isn't so strange for late March in ND but I knew we were in a blizzard warning. Then I heard more thunder and saw lightning...and then it started to snow. Weird! Here is what it looked like just a few hours after the thunder and lightning:

This is what I woke up to the next morning:

(not my pictures, I took them from my local newspaper's website here)
Anyway, after this little recurrence of winter, I'm especially yearning for spring and summer and the projects I've got planned.
Being that last summer was the first in our newly-built house, my husband built a deck. I've been itching to work on that this summer and make it an awesome place to hang out and relax. Here are my plans:

The deck is big - 12x27. We have sliding doors out from the dining area inside that will go straight to the dining area outside. We are planning on building a bar under which we can slide our grill and a big barrel cooler (you know, the type you see in convenience stores?) and also use as storage for cushions and stuff when they're not in use. Over the bar and dining area (12x12) I'm going to put some sort of shade - maybe lattice or a pergola or something canvas. The other part of the deck will be a little conversation area (directly across from the living room window). The things shaded green above are planters.
Here are some inspiration pictures I've been collecting. I have to apologize in advance for not giving proper credit for these pics. I started collecting them long before I planned on blogging. If any of the pictures below belong to you, please email me and I will be happy to credit you.

I love the canvas shades on this pergola and the lights make me super happy.

This pergola is so beautiful but sadly, not really in my budget :(

Because my deck faces west it gets really, really hot. I'm thinking of adding some outdoor curtains to help keep it cool. (I think this picture came from Pottery Barn)

More outdoor curtains - I love how it softens the area and makes it more cozy!
I'll be sharing more ideas as I come across them and I will be sure to keep you up to date on any progress we make as we do. However, considering that this is what my deck looks like now, it is going to be a little while!

So, what are your big plans for spring/summer? Does anyone have any ideas for me for the pergola/covered area?
Wednesday, March 16, 2011
Easy DIY Art (Before & After)
I recently showed you these faux bamboo frames I picked up while thrifting. I paid $3 for each of them. I loved them right away despite the dingy paint finish and gaudy geishas. I knew right away they were going in my master but I just wasn't sure what I wanted to put in them. Well, this weekend I had an epiphany :)


I started by giving them a fresh coat of Heirloom White. They were an off white to start with but they had some sort of glaze that just made them look dirty.

Whew...better already!


I realize that the art doesn't look that bad from a distance, especially if you're into Chinoiserie like me, but trust me - they're pretty bad. They're embellished with sequins and glitter.

I took out all 50 of the little pins that were holding the back on to take the glass and backs off in order to paint. I couldn't get them back in so I improvised and used tape. Hey - it worked!

I filled them with my mocha Lovely Lattice! The color is what drew me to this fabric in the first place since it is super close to the paint color in my master and I love this fabric so much, I wanted to use every last bit of it.

I really love how they turned out and they give that corner some much needed character.

My husband isn't totally sold on them. He still thinks he's going to put up and display his autographed baseballs here...sorry, hun. Not going to happen! What do you think? Do you like them or should I replace them with sports memorabilia?
Tuesday, March 15, 2011
Corned Beef & Cabbage
I've said before that St. Patrick's Day is one of my favorite holidays and I stand by that. Also, corned beef and cabbage is one of my favorite meals :) Here is how I go about making it.

Start with your corned beef brisket. What makes corned beef brisket special is that it is wet-cured in a brine (typically) spiced with mustard seeds, cloves, allspice, peppercorns and/or other pickling spices.

Put the brisket in a stockpot with included spice packet and enough water just to cover. Bring to a boil and reduce heat, simmering for 2 1/2 - 3 hours.

When you have about 15 minutes remaining, add a quartered onion, some quartered potatoes and large carrots, sliced.

I didn't have any carrots on hand so I just skipped them. Yes, it did feel like it was lacking something but I think it was mostly color I was missing.

When potatotes and onions have been cooking for about 15 minutes, remove brisket to a warm pan, covered, and to the pot add a cabbage, quartered.

It was so tender I shredded it trying to take it out of the pot!

The potatoes and onions, half cooked in the broth from the brisket.

Allow cabbage to cook for 15-20 minutes and transfer to platter.

And there you have it - a super easy, yummy dinner...best of all? It only takes one pan! If you're lucky and have leftovers you can make corned beef hash for breakfast the next morning...I'll show you that next :)
Do you like corned beef?
Monday, March 14, 2011
Lattice Entertain You...
Yes, I'm cheesy. I love to title my posts with puns :) Well, I had a very productive weekend, I finally got my new curtains done in my open upstairs. Please excuse the before pictures - it is almost impossible to get a before picture of a window so I had to lighten them up using some photo editing software. Though the pictures might not be great, you get the idea!


We've got a patio door and window on the same wall. The curtains that were up before are nice but they don't close all the way and these windows face west so in the summer it gets HOT from the sun beating in.

This is the best before picture I could get - you can see the actual colors. That table doesn't go there permanently, it is going to be used as a nightstand in my guest bedroom redo. I just have it upstairs for now because my daughter likes to use it as a cage for her stuffed toys (and sometimes herself).

I decided to go the no-sew route on these. I would normally stitch them up but I didn't feel like getting my sewing machine out because I know I'll have to replace the needle next time I want to use it. Besides, I like to use rings with clips to hang curtains so I didn't need a rod pocket.
I just gave the fabric a quick press before I added my Stitch Witchery tape so it would lay right when I actually ironed it in.


I ironed in both long sides first and then folded the top and bottom hem over and ironed more tape in. I don't have an ironing board so I put a towel down on my counter top and iron right on there.

Here is an after pic...I love how they turned out and I'm kicking myself for waiting so long to get them done. I've had the fabric for this since October! Sometimes it does not pay to be a procrastinator :(


Here is a good after pic. I need to raise the curtain rods a couple inches. I don't really like them pooling on the floor, I just didn't want to do anything before I knew exactly how they would hang.

I still have a little bit of work to do with lining these and I've also got some different sheers to put up. I just love them. This is one of my favorite patterns of all time and the color just looks great with everything else in this great room.
I've got some other posts coming up from my weekend. This is a big week for me with St. Patrick's Day and everything!
So, there you've got it. Proof that you can make such a huge impact with such a simple change.
Saturday, March 12, 2011
Owl Love You... (Before & After)
I showed you this guy the other day, acquired on a recent thrifting excursion. Well, yesterday before the blizzard hit it was warm enough to spray paint. Yay!

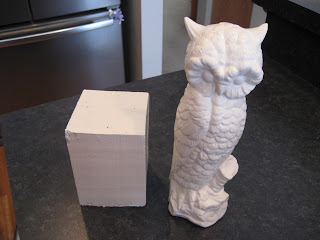


I've always loved owls and they're so hot right now. I mentioned back here that I needed something more for my dresser area and when I saw this guy, I knew he had to be mine.

He wasn't quite tall enough for the space on his own so I gave him a little boost with this old wood block I had from something else. I kind of like how the block is rough and sort of rustic. It gives Mr. Owl a nice edge.

He looks rejuvenated and refreshed after a new coat of Heirloom White. (The same color I sprayed my dresser tray.)

I adhered him to the block with a thick coat of E-6000.

He looks great on my dresser. I'm still planning on replacing that print with a larger, canvas version. I just need to convince myself to spend the money on it. I know I can get a great deal through Canvas People, I just need to get it ordered.


What do you think? Was he a good addition to my dresser? For $1 (the cost of the bird - the wood block and paint were on hand) I think he's a good deal!
This weekend I'm going to be sewing and hanging my new curtains and going on the hunt for a new computer. I can't wait!
Wednesday, March 9, 2011
Found Treasure
Well, I realize that Wednesday doesn't really classify as "early next week" but please don't hold that against me :) Today I am going to be sharing with you a few treasures I recently found thrifting. I wish I had some finished projects to show you but it hasn't been quite nice enough to spray paint and my weekends have been too busy for any real sewing projects.

I got this pretty little compote (?) for 50 cents. I couldn't believe my luck getting it for so cheap - it is in kind of rough shape but I really think it just adds to its charm.

I was thinking it would be useful on my desk to catch paper clips or pins etc.. For now I have it in my display case/buffet in the dining area. It goes well with some cool retro green goblets I've got.

These are one of my favorite finds and a project I've got in process.

They were $3.00 each and although I'm not in love with the artwork, I do love the frames. They've gotten a fresh coat of paint and are just waiting for the right art. I think they will be going in my master.

This guy is my most recent purchase. I got him for a buck and although he's not much to look at now, I plan on giving him new life in my master. I mentioned here that I am looking for something to add to my dresser and I think he might just fit in well.

These weren't a trifting find but a gift from my in-laws. They bought them with money received as a wedding gift in 1965 and never used them because they were too nice. Well, we ended up getting married on their 42nd anniversary so my mother in-law thought they might be something we would appreciate. My husband brought them home and never showed them to me because he thought I would hate them. He couldn't be more wrong!

I love the mid-century style of these and although they won't be used daily, I do plan on putting them to good use! I love them so much and am on the hunt for the rest of the set.
So, there you have it. Some of my more recent treasures. This weekend I am planning on sewing my new curtains for my open concept upper level. I blogged months ago about finding the perfect fabric and I am ashamed that I have put them off for so long! Well, not anymore!
What treasures have you found while rummaging or thrifting?
Subscribe to:
Posts (Atom)