Tuesday, August 30, 2011

My Favorite Couscous

Hello there! A while back I showed you my favorite Summer pasta salad. Today I'll be showing you a recipe I love just as much and is even easier! (For that reason, I might just love it more!)


Here is what I use. First, I use packaged couscous. I like to buy the pre-seasoned variety (roasted garlic & olive oil here) because I love a lot of flavor but the plain is good too. Then, I use crumbled feta, kalamata olives, marinated artichoke hearts and tomatoes. I love cherry tomatoes but the grape tomatoes are just a little bit sweeter and I like that to balance the saltiness of all the other ingredients.


I slice my grape tomatoes lengthwise.


...and do the same with my olives.


...quarter my artichoke hearts lengthwise.


...and add all of it to my couscous cooked according to package directions.


Toss in your feta...


Mix well and serve!


This is good warm or cold but I actually prefer it cold, right out of the fridge. I also like to serve it with a sweet fruit, like kiwi here, just to help balance the saltiness.

This really is one of my favorite things to make but my family isn't too fond of it so I don't get to make it often.

What do you love to make? Are you in love with these Mediterranean flavors like I am?

Thursday, August 25, 2011

Adirondack Chair Before & After

Remember here where I showed you the awesome deal I got on these Adirondack chairs? Well, I went ahead and gave them a simple makeover.


These chairs were SO faded...they just soaked up the paint. I ended up putting four coats on!


Anyhow, they turned out great! I love the crisp navy blue color.


They're a great addition and a nice lounge area for the deck. At $2.00 for the chairs and ottomans and about $20.00 for the paint, they're a great deal!


On another note, we finally started staining! (Yes, that is a different furniture set up there. I'll tell you about that another time!)


Linking up to:

Tuesday, August 23, 2011

DIY Sunburst Mirrors - On The Cheap!

Hello! So, I realize there are about a million tutorials all over the blogosphere for these and I'm probably on the back side of the trend but I was so excited about these that I figured I'd share anyway.


I made two mirrors. I wanted one large and one small so I bought two different sizes of mirrors. The larger of the two was $1.49 and the smaller was $0.99. I picked up two packages of barbeque skewers and a sheet of foam core poster board at the Dollar Tree.


I placed both mirrors on the board and traced them...


...then I cut out the circles.


I found the center of each circle and stuck a skewer in it to mark it off.


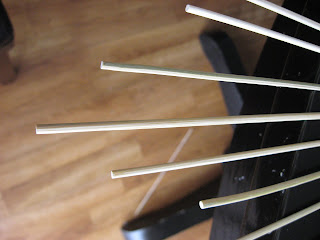
Then, I hot glued the skewers around, meeting in the middle and trying to evenly space them.


Then, I glued a skewer at the edge of the board between each of the skewers affixed at the middle.


Then, I glued more on either side of those glued at the edge of the board but glued them at the in-between point of the other skewers.


Finally, just for good measure, I glued the crap out of it. I put a thick coat of hot glue over the whole thing just to make sure it all stuck together.


View from the top :)


I painted one oil-rubbed bronze and the other heirloom white, making sure to evenly coat all sides of the skewers and the piece of foam board.


I poked a hole in the back of the foam board for hanging. I love the finished product! This one is big - almost three feet wide.
(Yes, I realize this isn't perfectly centered on the wall. For now, it's good enough!)


For the smaller one, I used the same process but first cut the skewers in half.


It's just what my downstairs bath needed!


The total cost for this project was $5 - for BOTH MIRRORS! $2.50 for the mirrors themselves, $2.00 for two packages of skewers and $0.50 for the foam board. I had the paint on hand.

For $5.00, I don't care if I'm behind the times or coming in at the tail end of this trend. I love my mirrors :)

Have you made any DIY sunburst mirrors like this? I know I've seen so many beautiful variations out in blogland...if you have, link it up in the comments below! I'd love to see!

Monday, August 22, 2011

DIY Flush-Mount Drum Shade

Hello! First, I want to apologize for my extended absence. This has been a crazy busy Summer and although I've gotten a couple projects done, I haven't had time to actually blog them. I will be better. I promise :)  Second, I want to welcome my new followers! I'm looking forward to sharing lots of projects with all of you :)

Raise your hand if you've got these generic, builder-grade (I call them boob lights) light fixtures in your home...don't be shy! I know they're pretty standard and it's so easy to overlook them when you're focusing on other design aspects of a room. I'm here to tell you that you can prettify your lighting in LESS THAN five minutes WITHOUT having to do any wiring! Yes we can!


With a simple drum shade from Target, a nipple, coupling and a cross bar, I've updated my light fixture.


First, remove the finial at the bottom of the glass shade and slide the whole thing off.


Then, use a nipple and a coupler until it's long enough to reach the part of the shade that sits on the socket (I know, I'm not very technical here.) and add your crossbar to hold the shade up. I put the finial back on the bottom of the nipple just to make it look a little nicer.

I still need to get something to use as a diffuser to cover the bottom but haven't really decided what to do yet. I considered a light-colored, thin fabric but am a little concerned about heat build up in the light. Because the shade fits snug against the top of the light there isn't really air flow. I'm thinking I'm going to have a piece of glass or fiberglass cut so there is an inch or so around the edges but it can still be held on snugly by the finial. I just haven't had time to get that done yet. For now, it doesn't look horrible unless you're looking straight up into the light.


I really love the end result and can't believe how it makes the ceiling in this room look so much taller! I think I'm going to have to replace a couple more of these in my house :)

I've got a few more posts in the works for this week. I promise that from now on I'll be better! I'm really looking forward to fall and all the fun projects that come along with it!


Linking up to:
Related Posts Plugin for WordPress, Blogger...